Tool Usage for AIRBOT Pro#
In this tutorial, we introduce several functions for AIRBOT Pro, including:
-
Basic functions control: Supply simple control interface for AIRBOT Pro. -
Zero calibration: Use for position calibration when control service notices to make calibration. -
Params checking: Checking parameters of your AIRBOT Pro which may supply useful message when meeting problems. -
Keyboard control: Enable to control AIRBOT Play through your keyboard. -
Sync following: Allow one AIRBOT Play to run following another synchronously.
Warning
- Confirm you have setup both your hardware and software correctly based on our guideline, and your hardwares are power on successfully (the light strip of hardware control panel should be on).
- The firmware has been upgraded to latest.
- The robot will move to a specific pose during starting process, being too close to robot's workspace may be very dangerous.
Basic functions#
Connect rebot#
- Plug on the power cable the robotic arm will display white flashing light effect.
- After inside system getting ready, the light effect will change into white constant, then your AIRBOT Pro is permitted to operate.
- Use a network cable to connect the computer to the robot.
- Change the cable connection ip address of the computer to 192.168.254.11
- Run ping 192.168.254.10 to check whether the robot is successfully connected
Launch robot#
- Keep pressing the button on the hardware control panel for 2 seconds, the light effect would change into yellow waving for system checking. Or just use
launch_robotmethod of classAirbotPlayin ourSDK. - If everything is OK, the light effect would turn into green waving then start moving to prepare pose. Please keep a safety distance and wait util it turns green constant.
- Then you can use following functions by buttons or our
SDK.
Quickly control gripper#
Pressing the button at the end of the robotic arm (below the link between joint 5 and 6) shortly enable quickly open or close gripper. Note that only two fingers gripper(G2) is supported.
Demonstrate and replay#
- The robotic arm will enter
ONLINEmode with green light effect since control service startup successfully. Keep pressing the button at the end of the robotic arm for nearly 2 seconds will enable you to enterDEMONSTRATEmode with blue light effect. - Pressing the button on the hardware control panel on the base of robotic arm shortly will start recording following robot's states while the light effect turn into blue when in
DEMONSTRATEmode. - Back to
DEMONSTRATEmode and stop recording at any time by shortly pressing the button at the hardware control panel. - Keep pressing the button at the end for 2 seconds brings you back to
ONLINEmode fromDEMONSTRATEmode. - Double-click the button at the end to enter
OFFLINEmode with constant purple color light effect fromONLINEmode orDEMONSTRATEmode. - When in
OFFLINEmode, clicking the button on panel would drive your AIRBOT Play to the start point of recorded waypoints end with flashing purple color light effect. - Press the button on panel again to start replaying your recorded waypoints with purple following light effect. A return action will be conducted until it reaches the start point after reaching the end of waypoints. Note that
E2Bwill not replay during this period. - During replaying, you can press the button on panel any time to stop or resume your replaying.
Exception recovery#
Sometimes the robotic arm may enter ERROR state because of incorrect using or our potential bugs with constant red light effect. Double-click the button on panel may help you to come back normal mode after clearing soft error.
Shutdown robot#
If you want to stop your operation, just keep pressing the button on the Base Board for 2 seconds or just use shutdown_robot method of class AirbotPlay in our SDK then the robot will go back to hard zero pose. Keep a safety distance and wait util the light effect turn white constant.
# example
from airbot_py.airbot_play import AirbotPlay
robot = AirbotPlay(ip="192.168.254.10")
robot.shutdown_robot()
Zero calibration#
You should follow this guideline to calibrate your zero position when control service throws a calibration requirement.
Warning
- Confirm you have setup both your hardware and software correctly based on our guideline, and your hardwares are power on successfully (the light strip of hardware control panel should be white constant).
- The firmware has been upgraded to latest.
- You have shutdown your launching process.
Calibration guideline#
-
Prepare to maintain AIRBOT Play's position using your hands since it will fall down after running the calibration command.
-
Run the
calibration_robotmethod of classAirbotPlayin ourSDKand the robotic arm will release motors' brakes. Pull the robotic arm to the position as shown following. The motor on joint 1 should be placed at the middle and the motors on joint 2 and 3 should be placed at the lowest hardware limitation position. Others motors are not need to move except for previous condition can't be meet.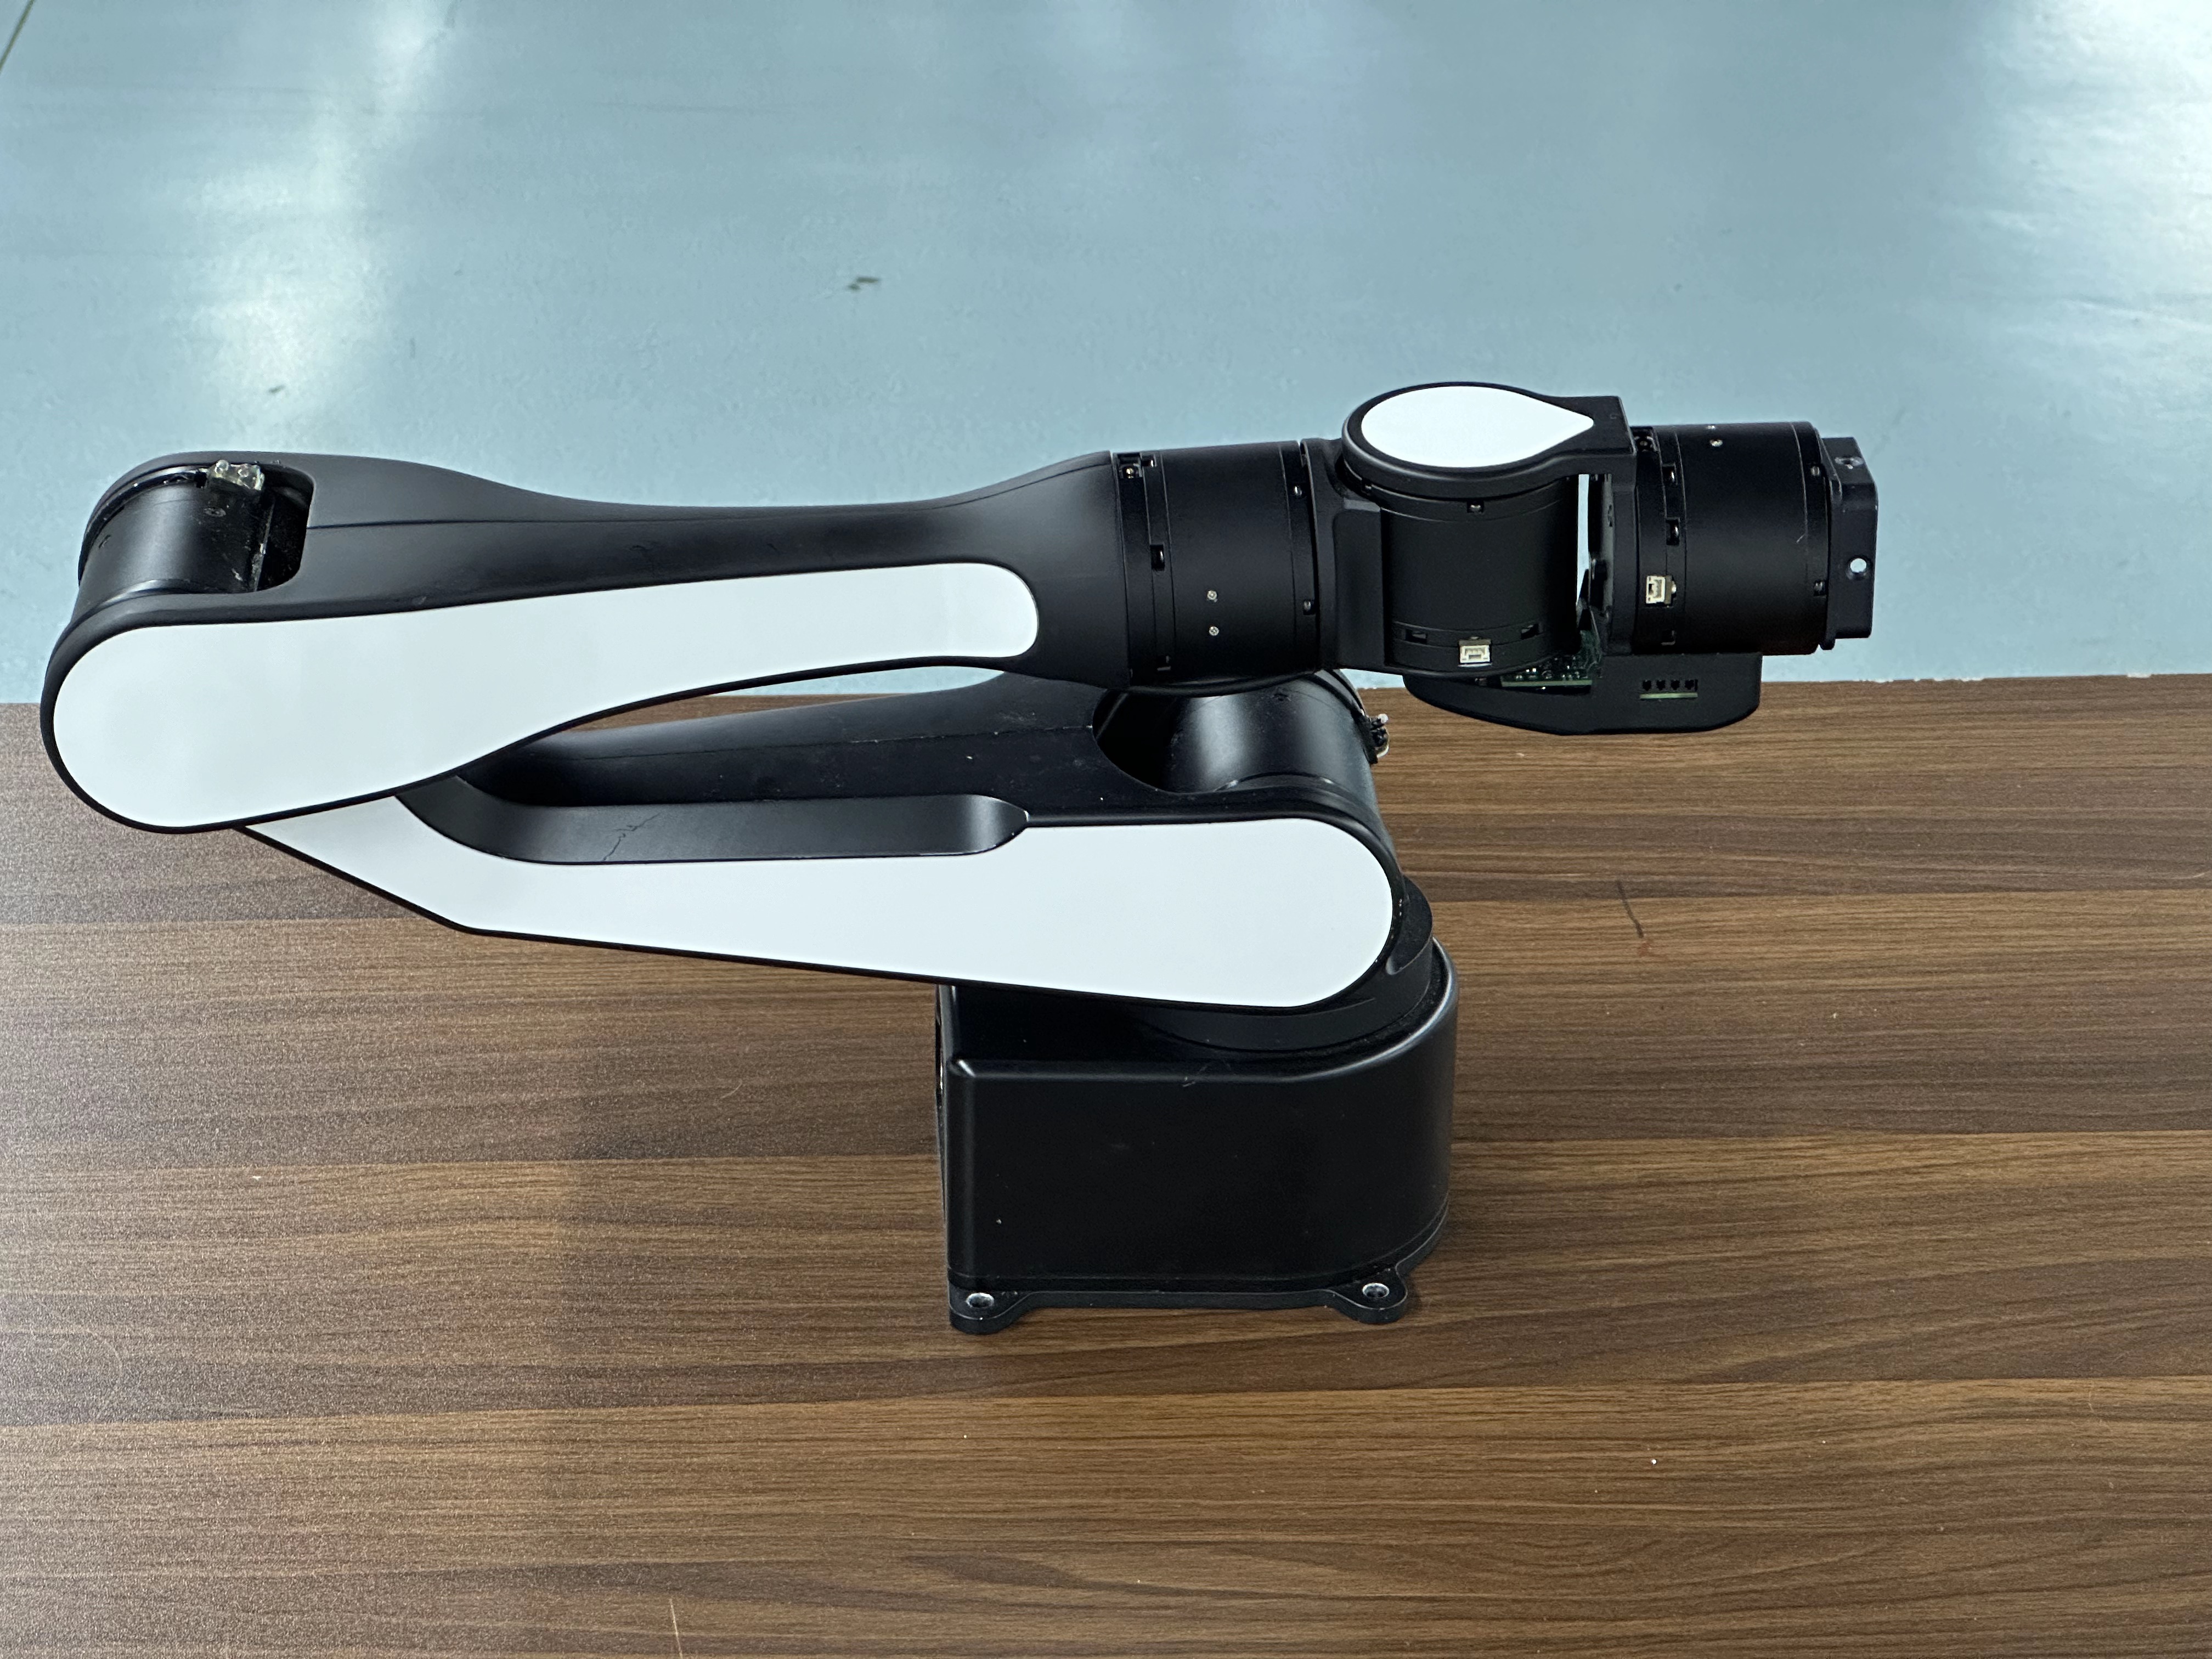
-
Run the
calibration_confirmmethod of classAirbotPlayin ourSDK, the robotic arm would move to its hardware zero position. Wait util the light effect turn back white constant.
from airbot_py.airbot_play import AirbotPlay
robot = AirbotPlay(ip="192.168.254.10")
robot.calibrate_robot()
time.sleep(10)
calibrate_confirm()
Params check tool#
Warning
- Confirm you have setup both your hardware and software correctly based on our guideline, and your hardwares are power on successfully (the light strip of hardware control panel should be on).
- The firmware has been upgraded to latest.
- No other devices or processes are sending CAN message on CAN bus.
- Run the
get_system_paramsmethod of classAirbotPlayin ourSDK
# example
from airbot_py.airbot_play import AirbotPlay
robot = AirbotPlay(ip="192.168.254.10")
robot.get_system_params()
Keyboard control tool#
TBD
Sync following tool#
Warning
- Confirm you have launch at least two AIRBOT Pro and connect them using network cable to your LAN.
- Please keep master robotic arm (which is used to lead other arms to move) still when start following.
- You can set more than one slave arm but only one master.
-
Need to use python sdk to start one control one, pro control pro is not supported for the time being.
-
An example of the play Control pro is shown below.
Preconditions : play and pro control services need to be enabled
# example
def joint_follow_example():
    """
    Example of controlling AIRBOT Play following another robot's joint position.
    """
    master_robot = AirbotPlay(ip="192.168.254.10")
    slave_robot = AirbotPlay(port=50000)
    slave_robot.slave_mode(int(master_robot.params["ros_domain_id"]))
    slave_robot.follow_start()
    time.sleep(100000)
    slave_robot.follow_stop()