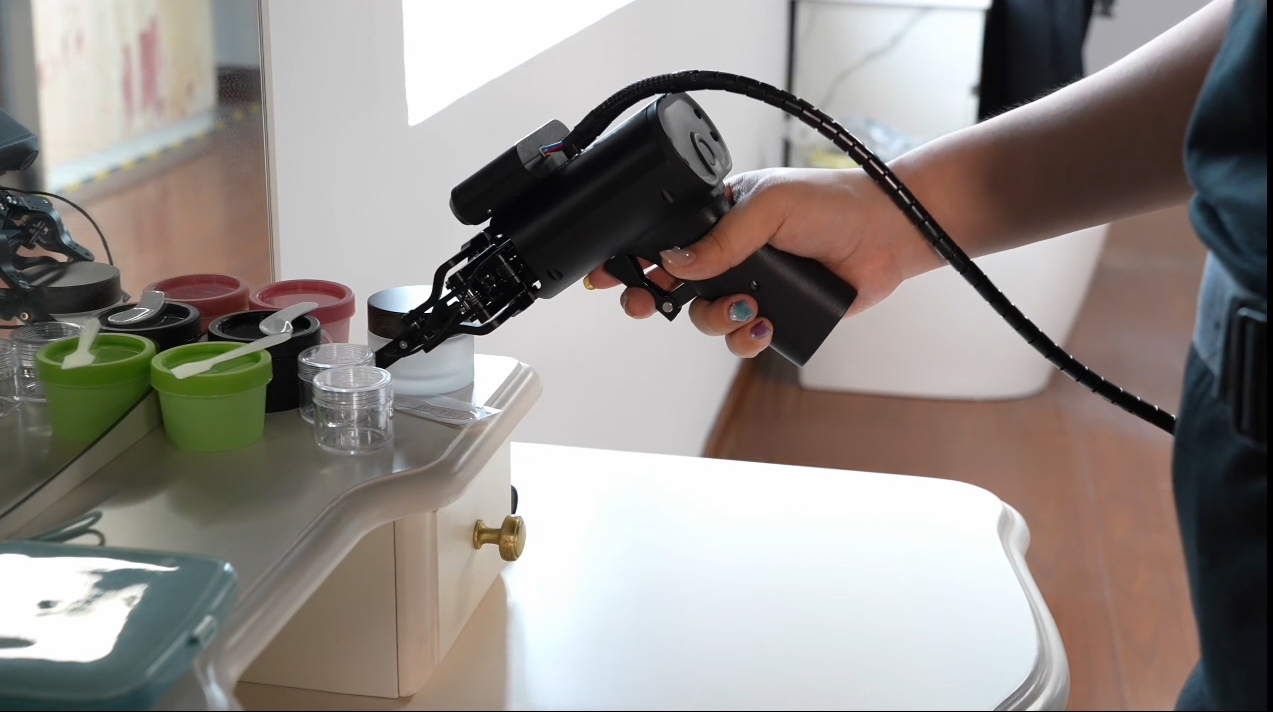
LeRobot Play Data Acquisition#
Environment Configuration#
Environment Requirements Overview
-
Operating-system requirements
Architecture Ubuntu 22.04 LTS Ubuntu 24.04 LTS x86_64 ✅ Supported ✅ Supported ARM64 ✅ Supported ❌ Not supported -
Minimum hardware requirements
- CPU: Intel i5 or a processor with equivalent or better performance
- Memory: 8 GB RAM
Software Installation#
System Configuration and Python Version Matrix#
| Architecture | Ubuntu Version | Python Version |
|---|---|---|
| x86_64 | 24.04 | 3.12 |
| x86_64 | 22.04 | 3.10 |
| ARM64 | 22.04 | 3.10 |
Installation Steps#
Determine your Python version from the table above, then run the corresponding commands:
# 1. Create a Python virtual environment
# Select the command for your system (choose one of three):

# Configuration 1: x86_64 + Ubuntu 24.04
conda create -y -n lerobot python=3.12

# Configuration 2: x86_64 + Ubuntu 22.04
conda create -y -n lerobot python=3.10

# Configuration 3: ARM64 + Ubuntu 22.04
conda create -y -n lerobot python=3.10

# 2. Activate the environment and install dependencies (all configurations use the following steps)
conda activate lerobot
conda install -c conda-forge libstdcxx-ng
conda install ffmpeg=7.1.1 -c conda-forge

# Install the AirBot core packages; replace <version> with the actual version
pip install airbot_hardware_py-<version>.whl -i https://pypi.tuna.tsinghua.edu.cn/simple
pip install lerobot_play-<version>.whl -i https://pypi.tuna.tsinghua.edu.cn/simple
pip install airbot_state_machine-<version>.whl -i https://pypi.tuna.tsinghua.edu.cn/simple
pip install mmk2_kdl_py-<version>.whl -i https://pypi.tuna.tsinghua.edu.cn/simple
Quick Solutions to Common Issues
Issue 1: The wheel package platform is not supported
Error: ERROR: airbot_hardware_py-<*>.whl is not supported
Cause: The Python version does not match the system.
Solution: Recreate the environment with the corresponding Python version.
# Ubuntu 24.04 → Python 3.12
conda create -y -n lerobot python=3.12

# Ubuntu 22.04 → Python 3.10
conda create -y -n lerobot python=3.10
Issue 2: The evdev package fails to install
Error: evdev compilation fails while installing lerobot_play-<*>.whl
Cause: GCC build tools are missing.
Solution:
Hardware Configuration#
Hardware List#
| Solution | Robotic Arm Configuration |
|---|---|
| Single-arm Play | 1×AIRBOT Play + 1×AIRBOT Replay or 1×AIRBOT Play + 1×AIRBOT Play with E2 |
| PTK | 2×AIRBOT Play + 2×AIRBOT Replay |
| TOK2 | 2×AIRBOT Play + 2×AIRBOT Replay |
| TOK4 | 2×AIRBOT Play + 2×AIRBOT Play with E2 |
| Quest3 | 1×Quest3 + 2×AIRBOT Play with G2 |
| Note | All solutions can be freely combined with USB or RealSense cameras. The Intel RealSense D435i is recommended. |
Binding the Robotic Arm#
Checking Device Recognition#
Make sure the system can recognize the robotic arm. Run the following command to inspect CAN interfaces:
Information
-
Recognized normally: If the command output shows CAN interface information such as
can0orcan1, the system has recognized the robotic arm correctly. You can proceed with binding.
-
Device not recognized: If the command returns no CAN interface information, the system has not detected the robotic arm and the driver must be installed.
After installation, disconnect and reconnect the data cable, then runip link | grep canagain to inspect CAN.
Binding Command#
Run the following command to bind the robotic arm:
After binding, disconnect and reconnect the data cable, then runip link | grep can again to inspect CAN.
Rebinding
If you need to bind the device again for any reason, first run the following command to clear the previous binding configuration:
Reconnect the device, then run the binding command again.
Querying Camera Devices#
Use the following commands to query device information for USB cameras and RealSense depth cameras, respectively:
# Query RealSense camera device numbers and configuration information
lerobot-find-cameras realsense
If the following error occurs during the
RealSensequery:Run these commands to configure
After configuration, reconnect the RealSense camera or restart the system for the rule to take effect.udevpermissions:
Modifying the Configuration File#
Before collecting data, configure the hardware devices and dataset parameters. The configuration file has four sections: follower-arm settings (robot), leader-arm settings (teleop), collection settings (run), and dataset settings (dataset).
Quick Start
Download the configuration-file template for your hardware combination:
Hardware Configuration Download Link Single-arm Play config_Play.yaml PTK config_PTK.yaml TOK2 config_TOK2.yaml TOK4 config_TOK4.yaml Quest3 quest3.yaml
Follower-Arm Settings (robot)#
Follower-arm configuration consists of device parameters and camera parameters:
Device Parameter Configuration#
| Parameter | Description | Accepted Values | Example |
|---|---|---|---|
robot.type |
Follower-arm type | airbot_play_followerairbot_PTK_followerairbot_TOK2_followerairbot_TOK4_follower |
airbot_play_follower |
robot.port |
CAN interface | can0, can1, etc. (if bound, this must match the binding name) |
can0 |
robot.id |
Identification ID | Using the same value as type is recommended |
airbot_play_follower |
Follower-arm type descriptions:
• airbot_play_follower: AIRBOT Play robotic arm + G2 gripper
• airbot_PTK_follower: PTK series
• airbot_TOK2_follower: TOK2 series
• airbot_TOK4_follower: TOK4 series
Camera Parameter Configuration#
Multiple cameras of two types are supported:
| Camera Type | Configuration Value | Features |
|---|---|---|
| USB camera | type: opencv |
General-purpose USB interface; captures RGB images only |
| RealSense depth camera | type: realsense |
Intel depth camera; supports RGB + depth images |
A complete follower-arm configuration is shown below:
robot:
  type: airbot_play_follower
  port: can0
  id: airbot_play_follower
  cameras:
    # RealSense camera configuration example
    right_hand_camera:                       # Camera name; may be set freely
    type: realsense                          # Camera category
    serial_number_or_name: "243322072684"    # Camera SN
    width: 640
    height: 480
    fps: 30
    color_mode: RGB                          # Color mode
    use_depth: false                         # Whether to enable depth images; disabled by default
    rotation: NO_ROTATION                    # Whether rotation is required
    # USB camera configuration example
    env_cam_A:                               # Camera name; may be set freely
    type: opencv                             # Camera category
    index_or_path: "/dev/video2"             # Camera port number
    width: 640
    height: 480
    fps: 25
    rotation: NO_ROTATION                    # Whether rotation is required
Leader-Arm Settings (teleop)#
| Parameter | Description | Accepted Values | Example |
|---|---|---|---|
teleop.type |
Leader-arm type | airbot_replayairbot_play_with_E2_leaderairbot_PTK_leaderairbot_TOK2_leaderairbot_TOK4_leader |
airbot_play_with_E2_leader |
teleop.port |
CAN interface | can0, can1, etc. (if bound, this must match the binding name) |
can0 |
teleop.id |
Identification ID | Using the same value as type is recommended |
airbot_play_with_E2_leader |
Leader-arm type descriptions:
• airbot_replay: AIRBOT Replay teaching arm
• airbot_play_with_E2_leader: AIRBOT Play robotic arm + E2 teaching device
• airbot_PTK_leader: PTK series
• airbot_TOK2_leader: TOK2 series
• airbot_TOK4_leader: TOK4 series
Collection Settings (run)#
run:
  fps: 30
  display_data: false
  num_episodes: 25
  episode_time_sec: 60
  reset_time_sec: 60
  single_task: "Grab the black cube"
| Parameter | Description | Default |
|---|---|---|
run.fps |
Data-collection frame rate (Hz), which controls the main-loop frequency | 30 |
run.display_data |
Whether to display camera images and joint states in real time | false |
run.num_episodes |
Maximum number of collection episodes; once reached, the program stops automatically and saves the dataset | 25 |
run.episode_time_sec |
Maximum duration of one episode (seconds); when it times out, the episode is saved automatically and the next episode begins | 60 |
run.reset_time_sec |
Maximum collection time after a reset (seconds); the same as episode_time_sec |
60 |
run.single_task |
Task-description text written to the dataset as metadata | "" |
Dataset Settings (dataset)#
dataset:
  repo_id: test_playe2
  video: true
  num_image_writer_processes: 0
  num_image_writer_threads_per_camera: 4
  video_encoding_batch_size: 1
  push_to_hub: false
| Parameter | Description | Default |
|---|---|---|
dataset.repo_id |
Local dataset directory name. Set a new, unique directory name each time the program runs. | |
dataset.video |
Whether to save images as video | true |
dataset.num_image_writer_processes |
Number of image-writer processes; modification is not recommended | 0 |
dataset.num_image_writer_threads_per_camera |
Number of writer threads for each camera; modification is not recommended | 4 |
dataset.video_encoding_batch_size |
Batch size for video encoding; modification is not recommended | 1 |
dataset.push_to_hub |
Whether to push the collected dataset to the LeRobot website | false |
Data-Collection Workflow#
Data-Collection Methods
Two collection methods are currently supported:
- Robotic arm teleoperation: Use a leader arm to control the follower arm in completing a task. This is suitable for conventional desktop manipulation scenarios.
- VR headset control: Wear a VR device for immersive operation. This is suitable for spatial interaction or complex three-dimensional manipulation tasks.
Method 1: Robotic Arm Teleoperation Collection#
Starting the Collection Program#
# Enter the Conda environment
conda activate lerobot
python3 -m lerobot_play.record --yaml <path to your config yaml>
Performing the Task#
- Operate the leader arm manually: Use the leader arm (
teleop) to control the follower arm in completing the specified task. - Start collection: Press the Spacebar to start collecting data.
- Save one episode: After each task is complete, press → (Right Arrow) once to save the current data.
⚠️ Caution: After pressing the key, wait for a period of time while the data is written to disk. The robotic arm is uncontrolled during this period. Do not put down the leader-arm AIRBOT Replay! Collection can continue after the data has been written.
- Reset the current episode: If a mistake occurs during a demonstration, press ← (Left Arrow) once to discard the current episode's data and restart the same episode (the episode number does not change).
-
Exit early: If you have completed the required number of episodes or need to interrupt collection, press Esc to exit immediately. The system saves all successfully completed episodes.
💡 Keyboard Shortcut Reference
Key Function Spacebar Start collecting data for the current episode → Save the current episode and prepare for the next one ← Discard the current episode and restart it Esc Terminate the entire collection task early Keys Not Responding?
LeRobot keyboard monitoring depends on X11. If you use Wayland (the default on Ubuntu 22.04+), key presses may not work.
Resetting the Environment#
- Environment reset: Before each episode, manually restore the experimental environment to its initial state, including:
- Returning objects to their starting positions
- Resetting the gripper to its initial state
- Arranging objects neatly within the camera's field of view
- Waiting time: The system waits for the environment to be reset according to the
reset_time_secparameter in the configuration file. Perform the preparation work during this period.
Data Storage Location#
Here,<repo_id> is determined by the dataset.repo_id field in the configuration file.
⚠️ Important: You must change
dataset.repo_idfor every new collection run. Otherwise, a dataset with the same name will be overwritten and historical data will be lost.
Method 2: VR Headset Control#
Before You Begin
Make sure you are familiar with basic Quest3 operations such as menu navigation and controller use before performing the following steps.
Preparation#
-
Network connection: Connect the computer and Quest3 headset to the same router with Ethernet cables, ensuring that they are on the same LAN.
-
Start the VRControl application:
- Open the VRControl application on the Quest in the specified order.
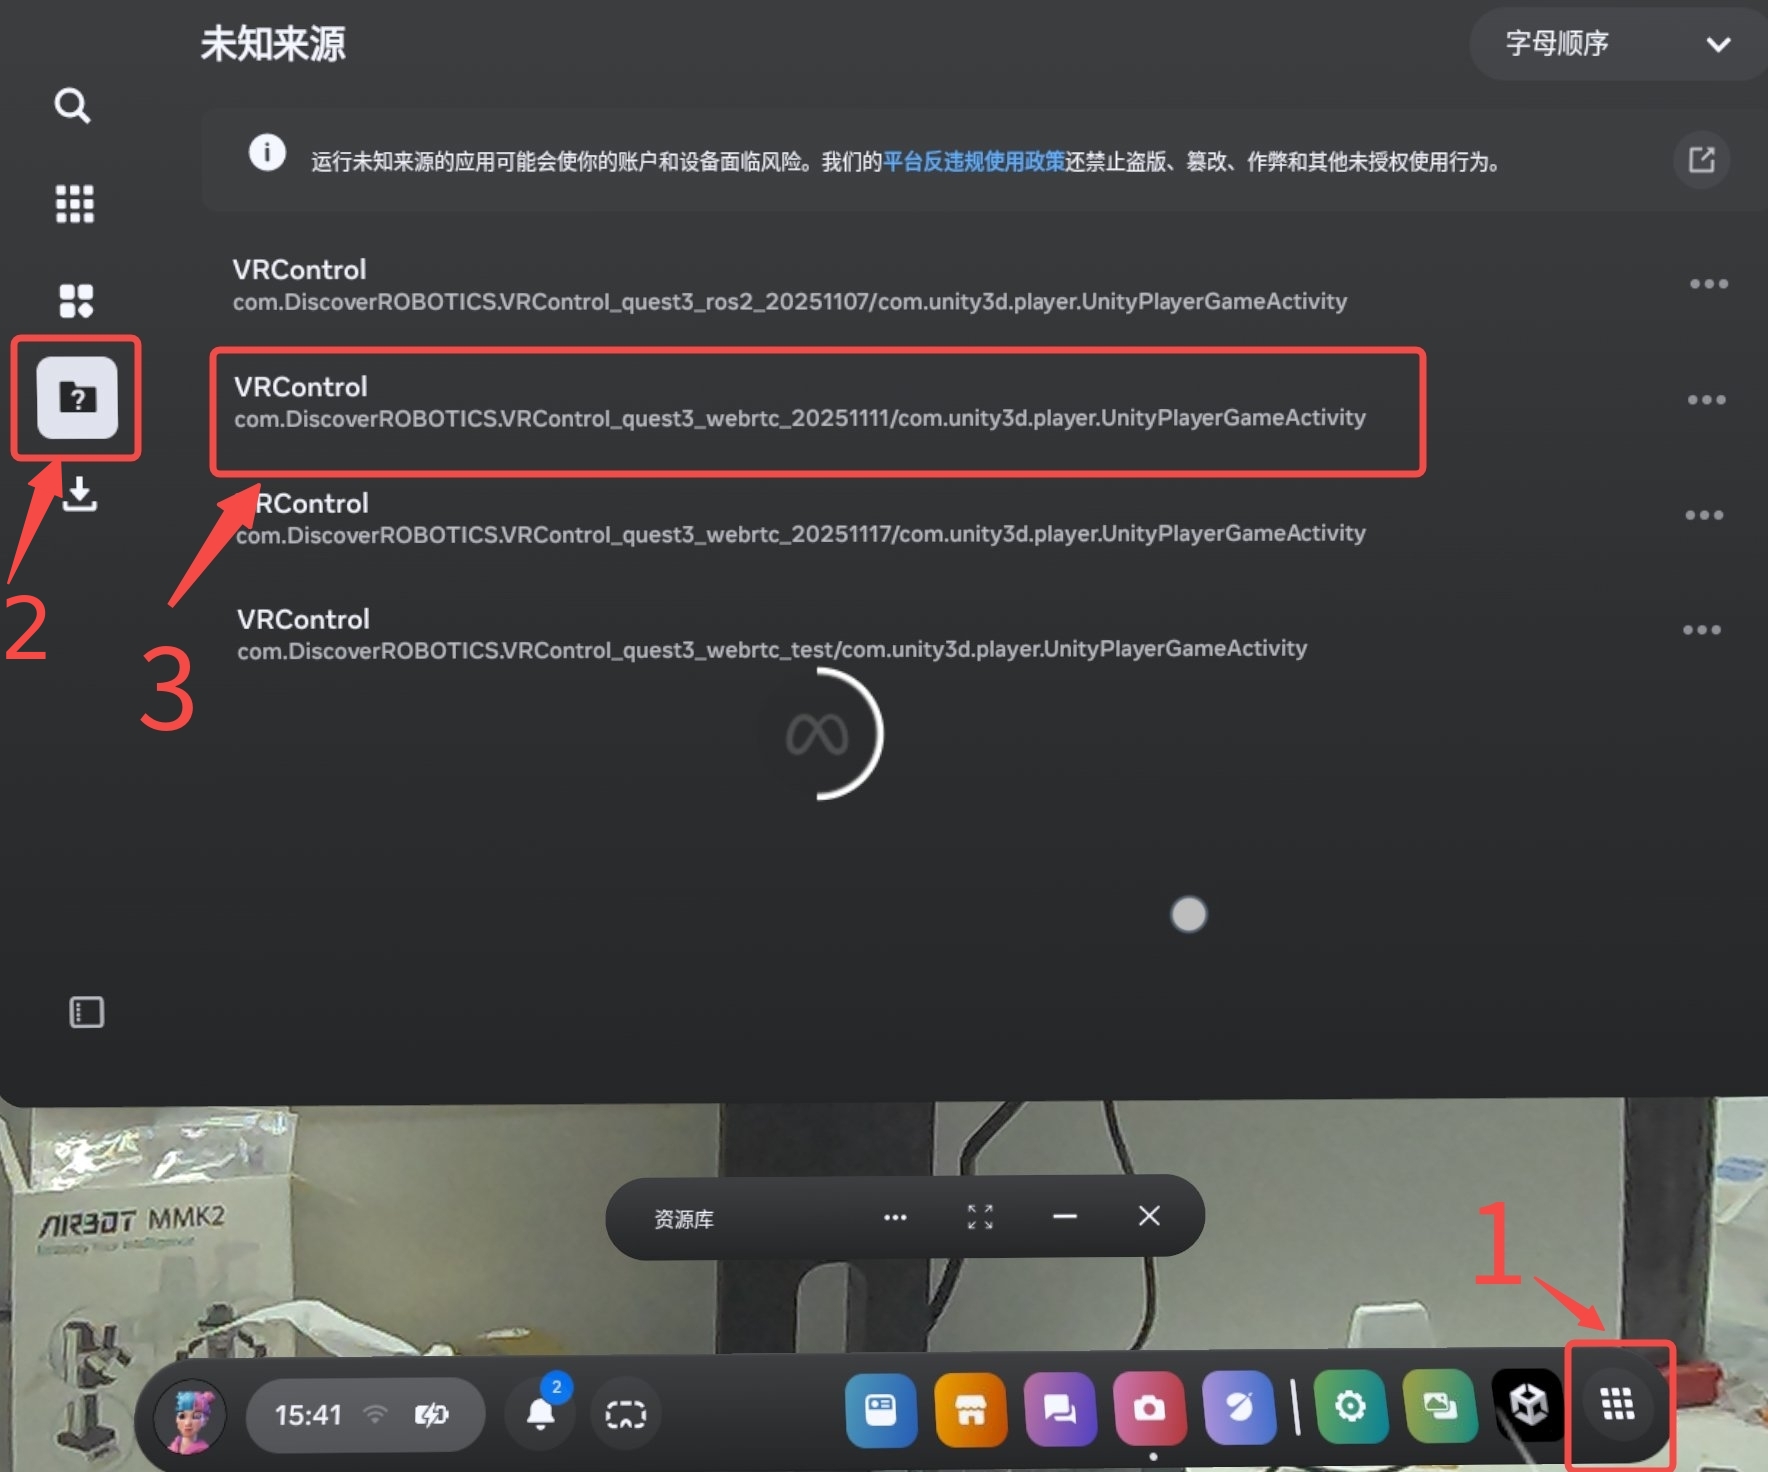
- After the application starts, select the Next button in the interface.
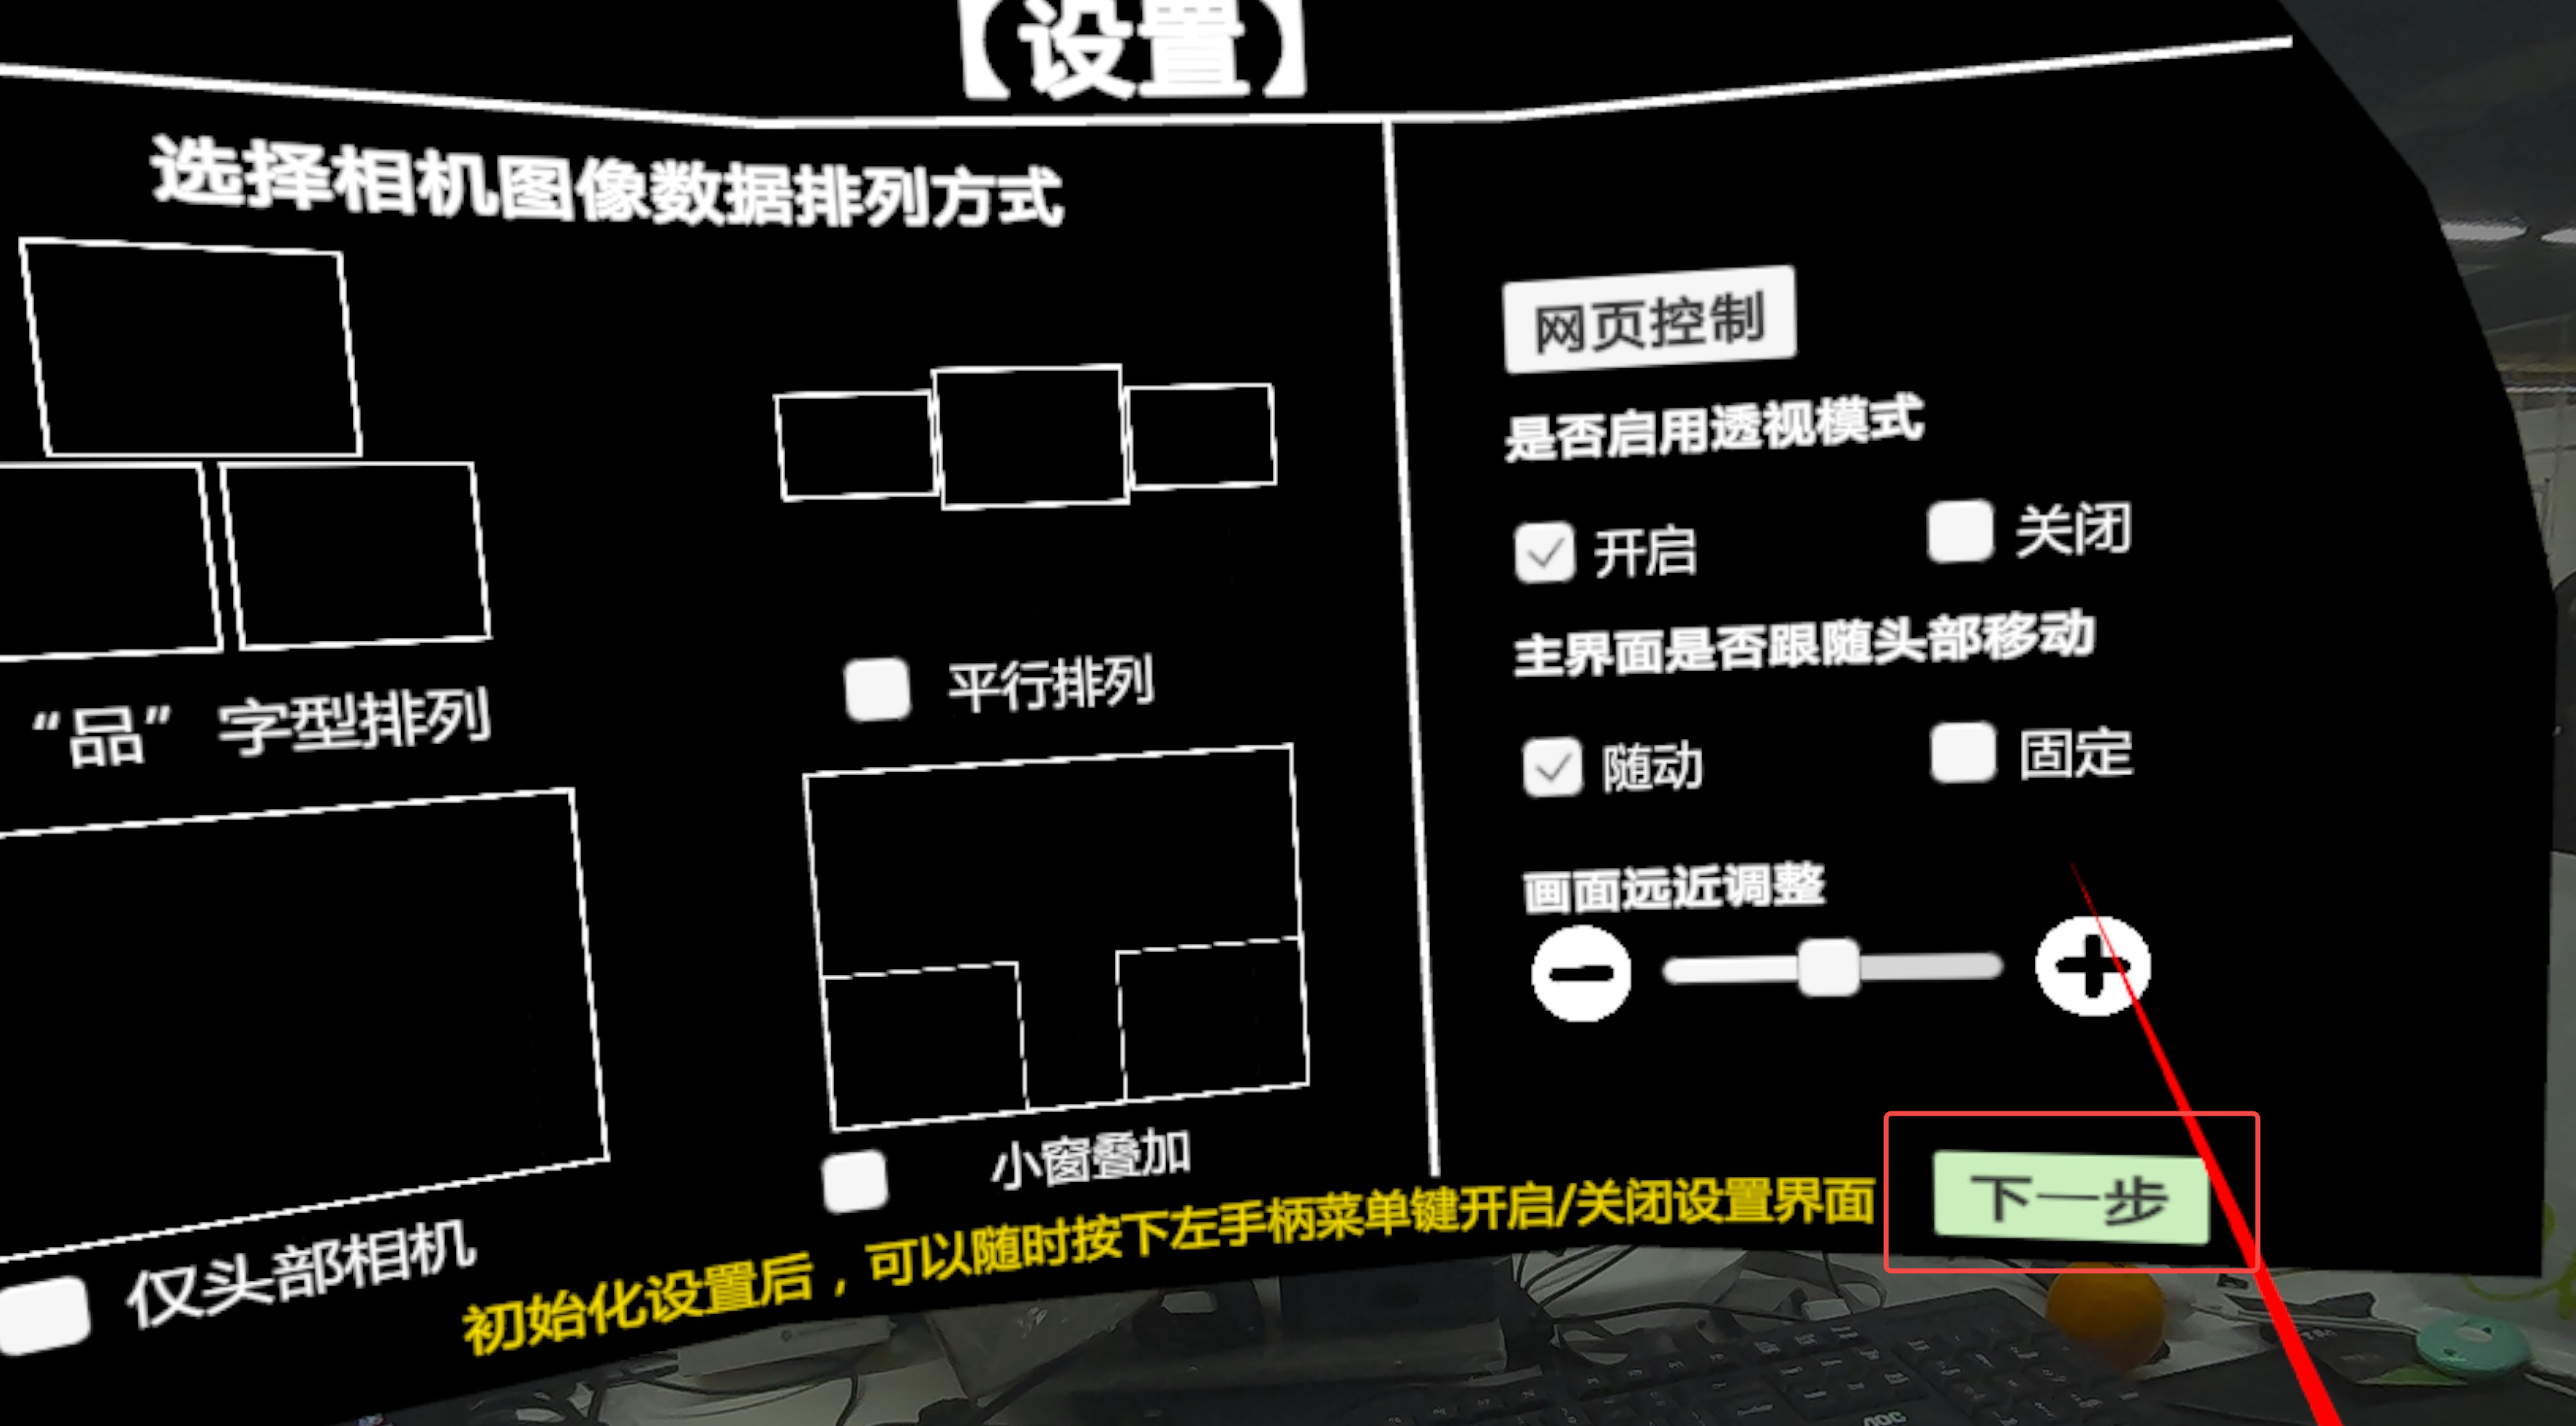
- Open the VRControl application on the Quest in the specified order.
Starting the Collection Program#
Run the following commands in a terminal to start data acquisition (replace the path with the actual configuration-file path):
# Activate the Conda environment
conda activate lerobot

# Start the collection script
python3 -m lerobot_play.record --yaml <path/to/your/config.yaml>
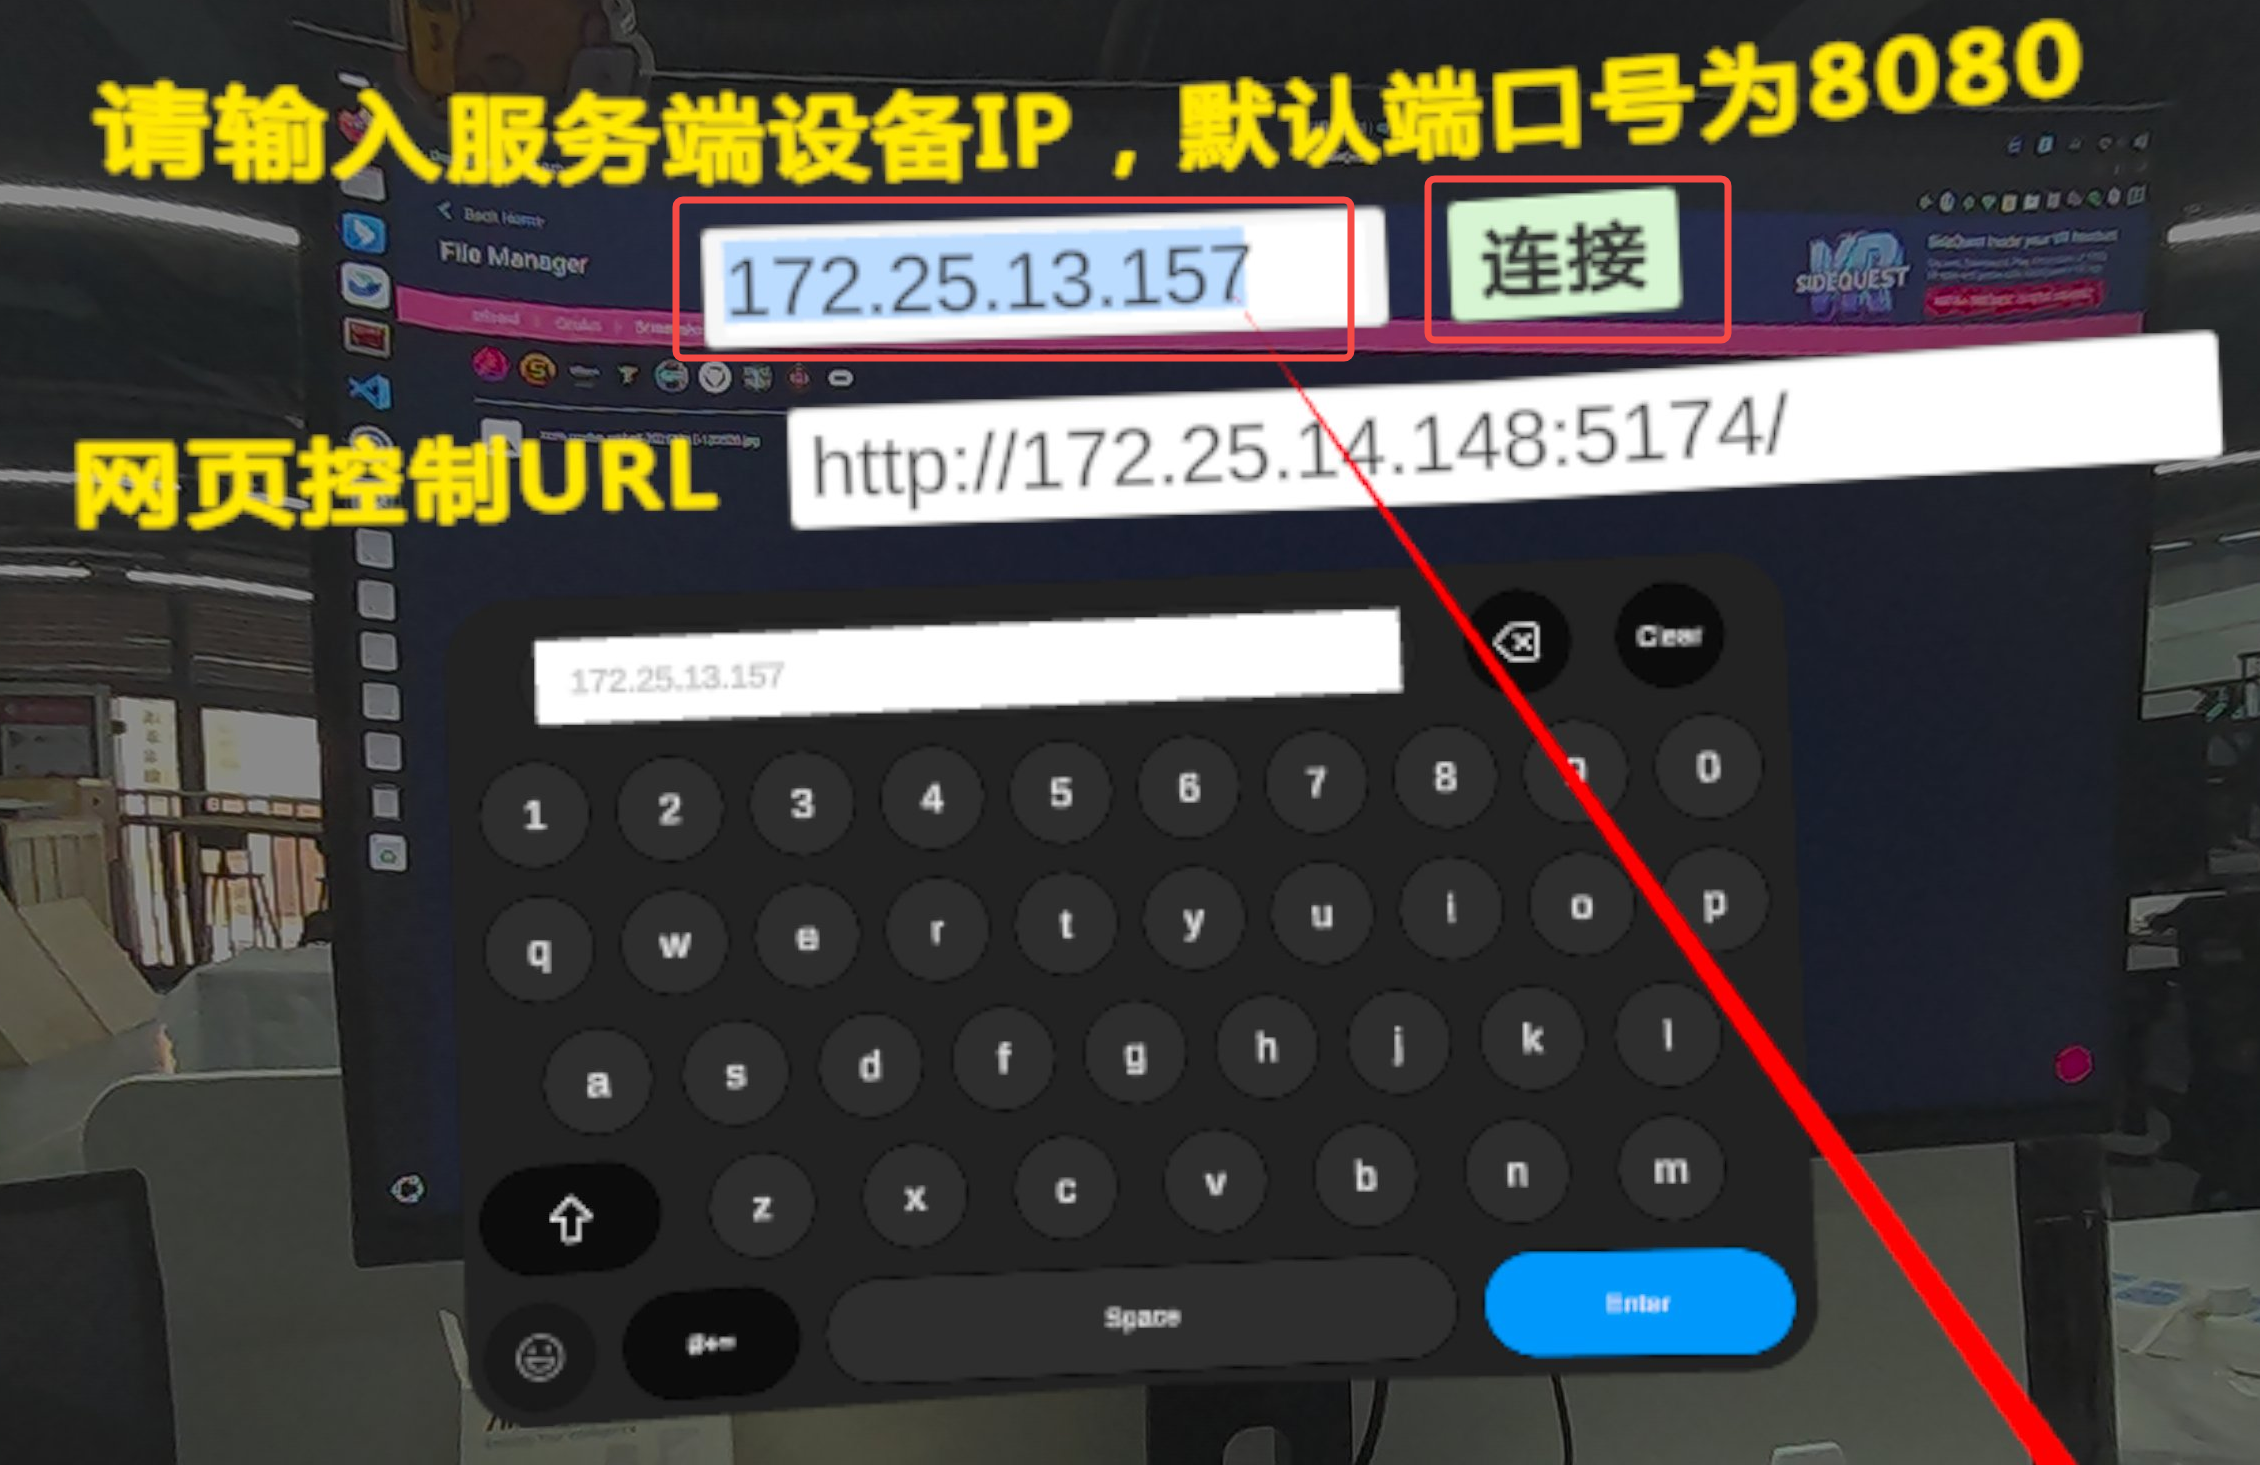
Configuring the IP Connection#
In the Quest VRControl application, enter the computer's wired IP address.
Run the following command in a computer terminal to view the wired-network IP address:
Verifying the Connection#
After the following information appears, you can use the VR controllers for data acquisition.
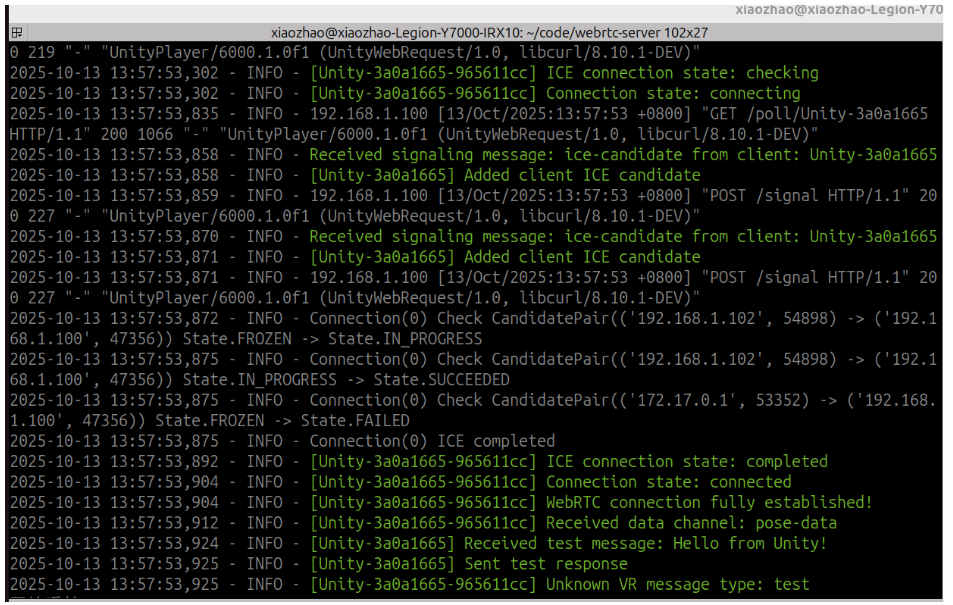
Controller button functions are described below:
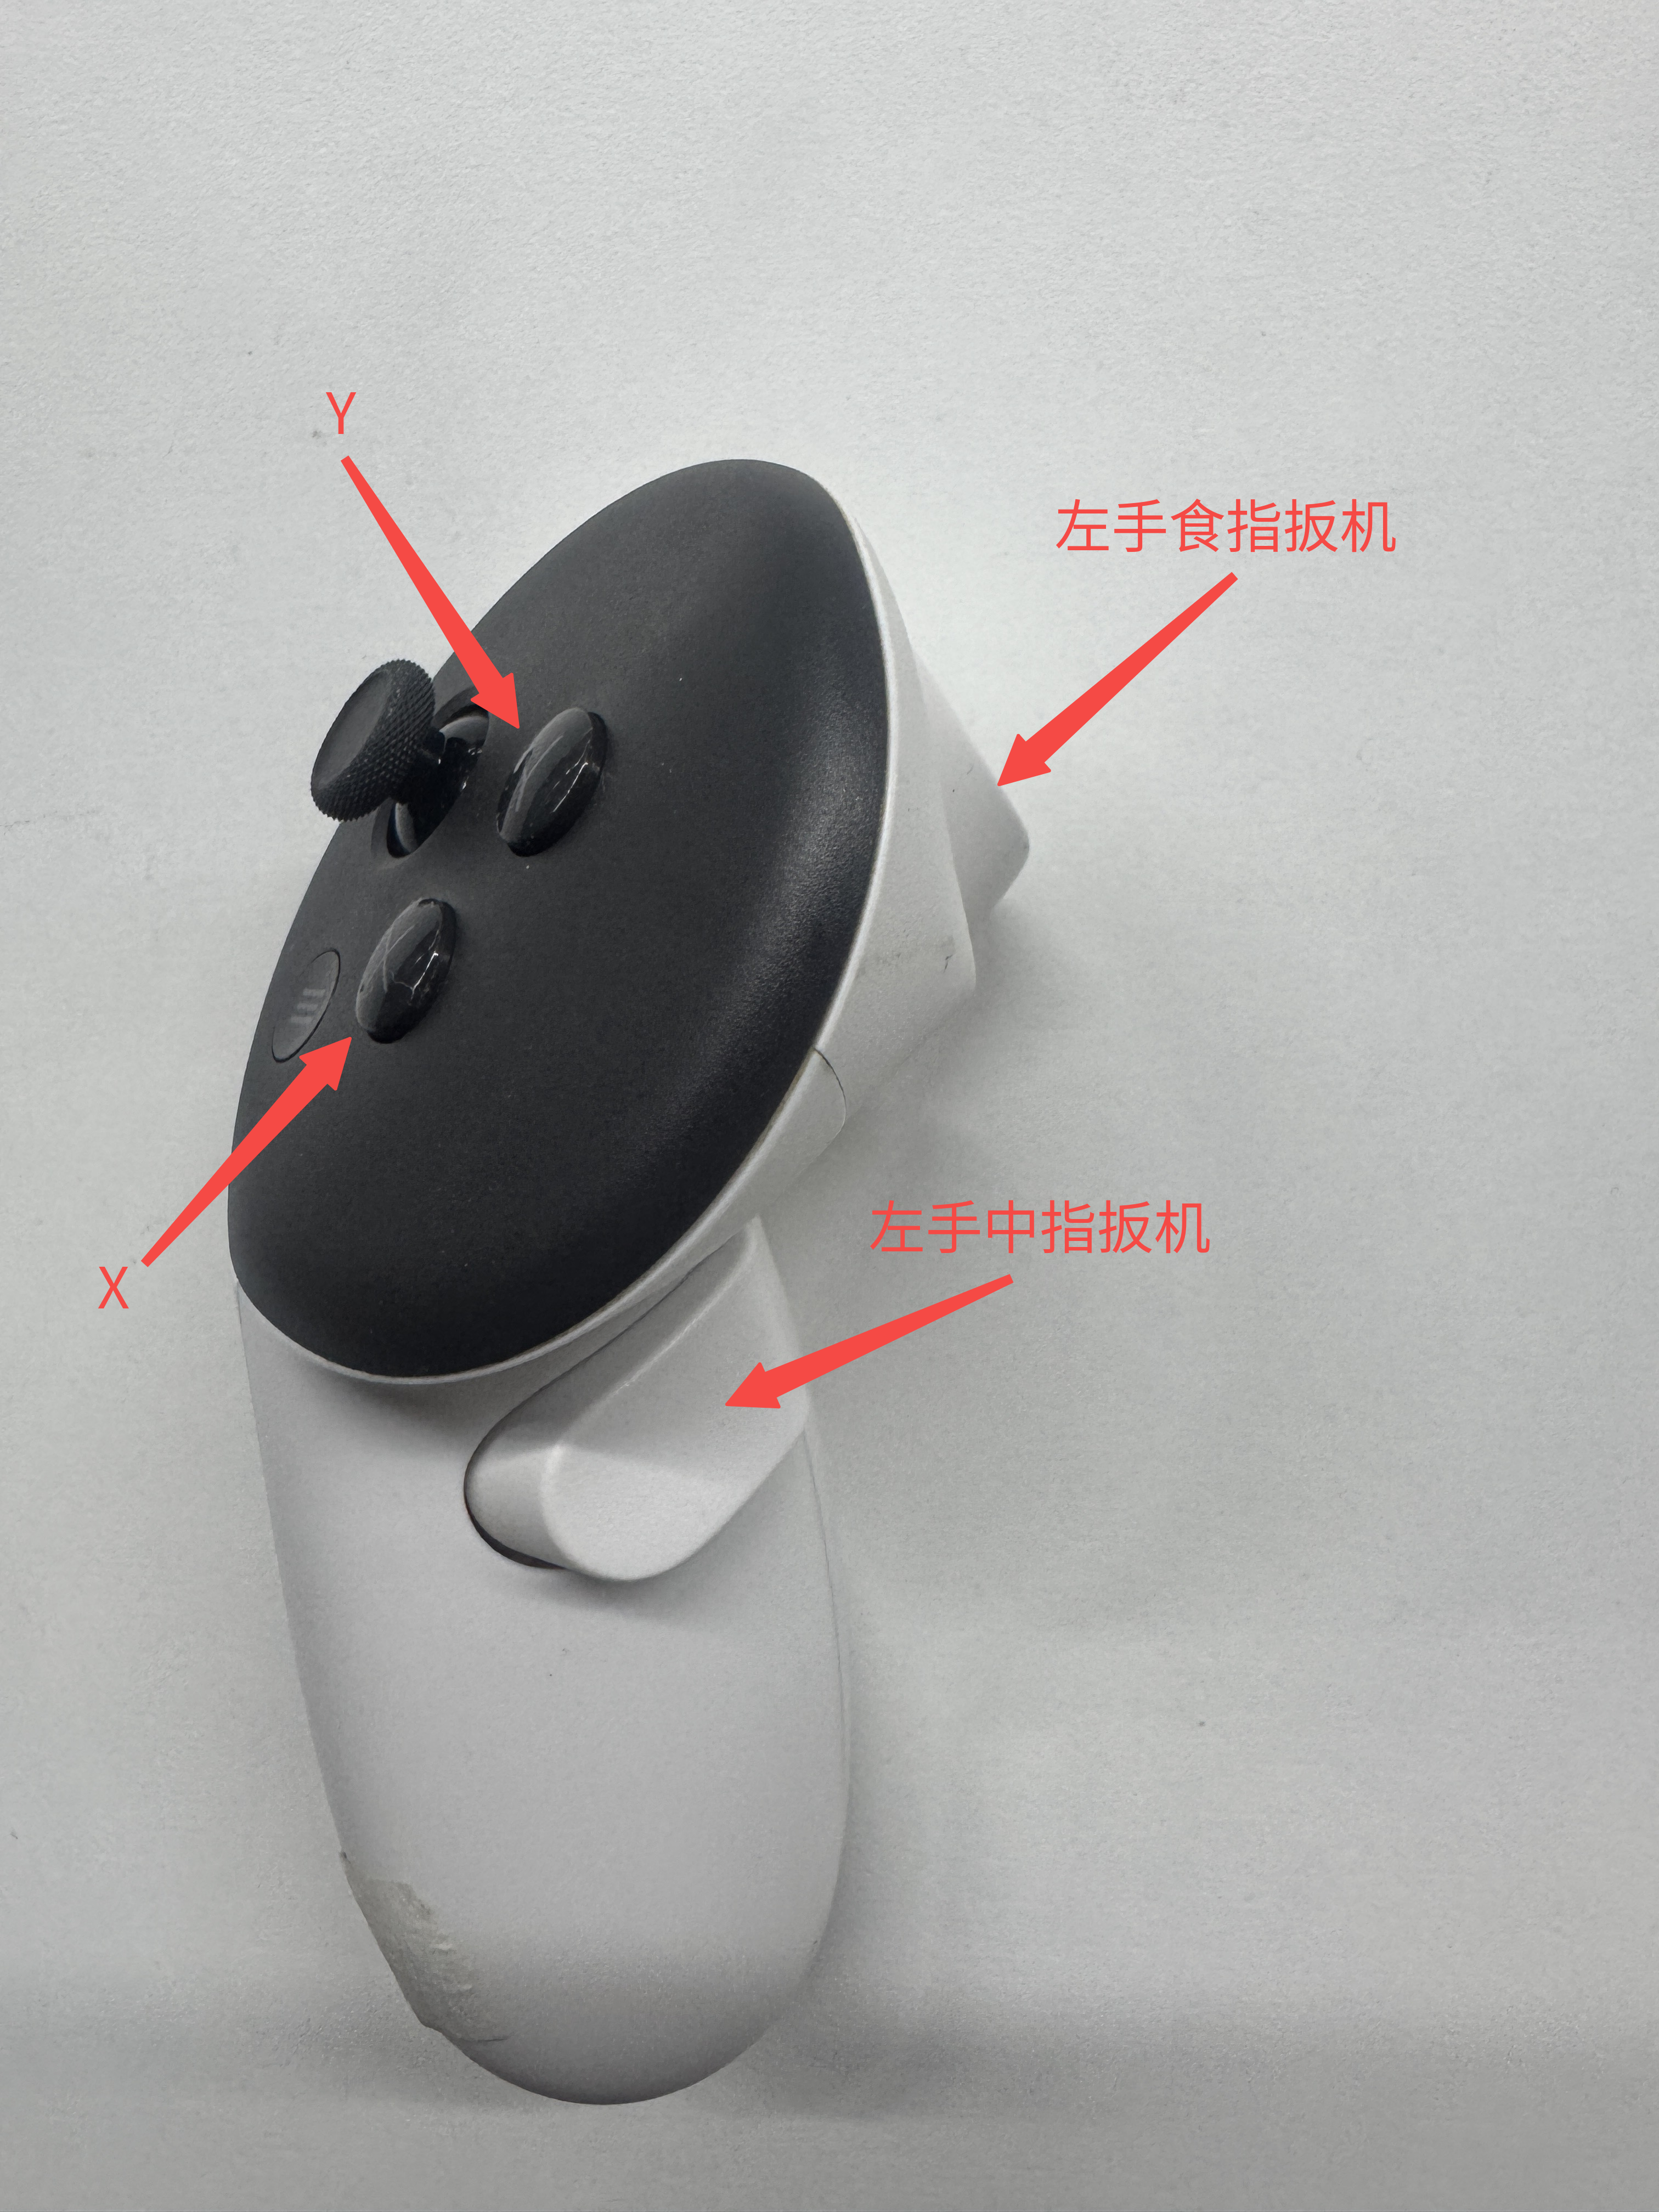
Figure 1: Left controller button layout
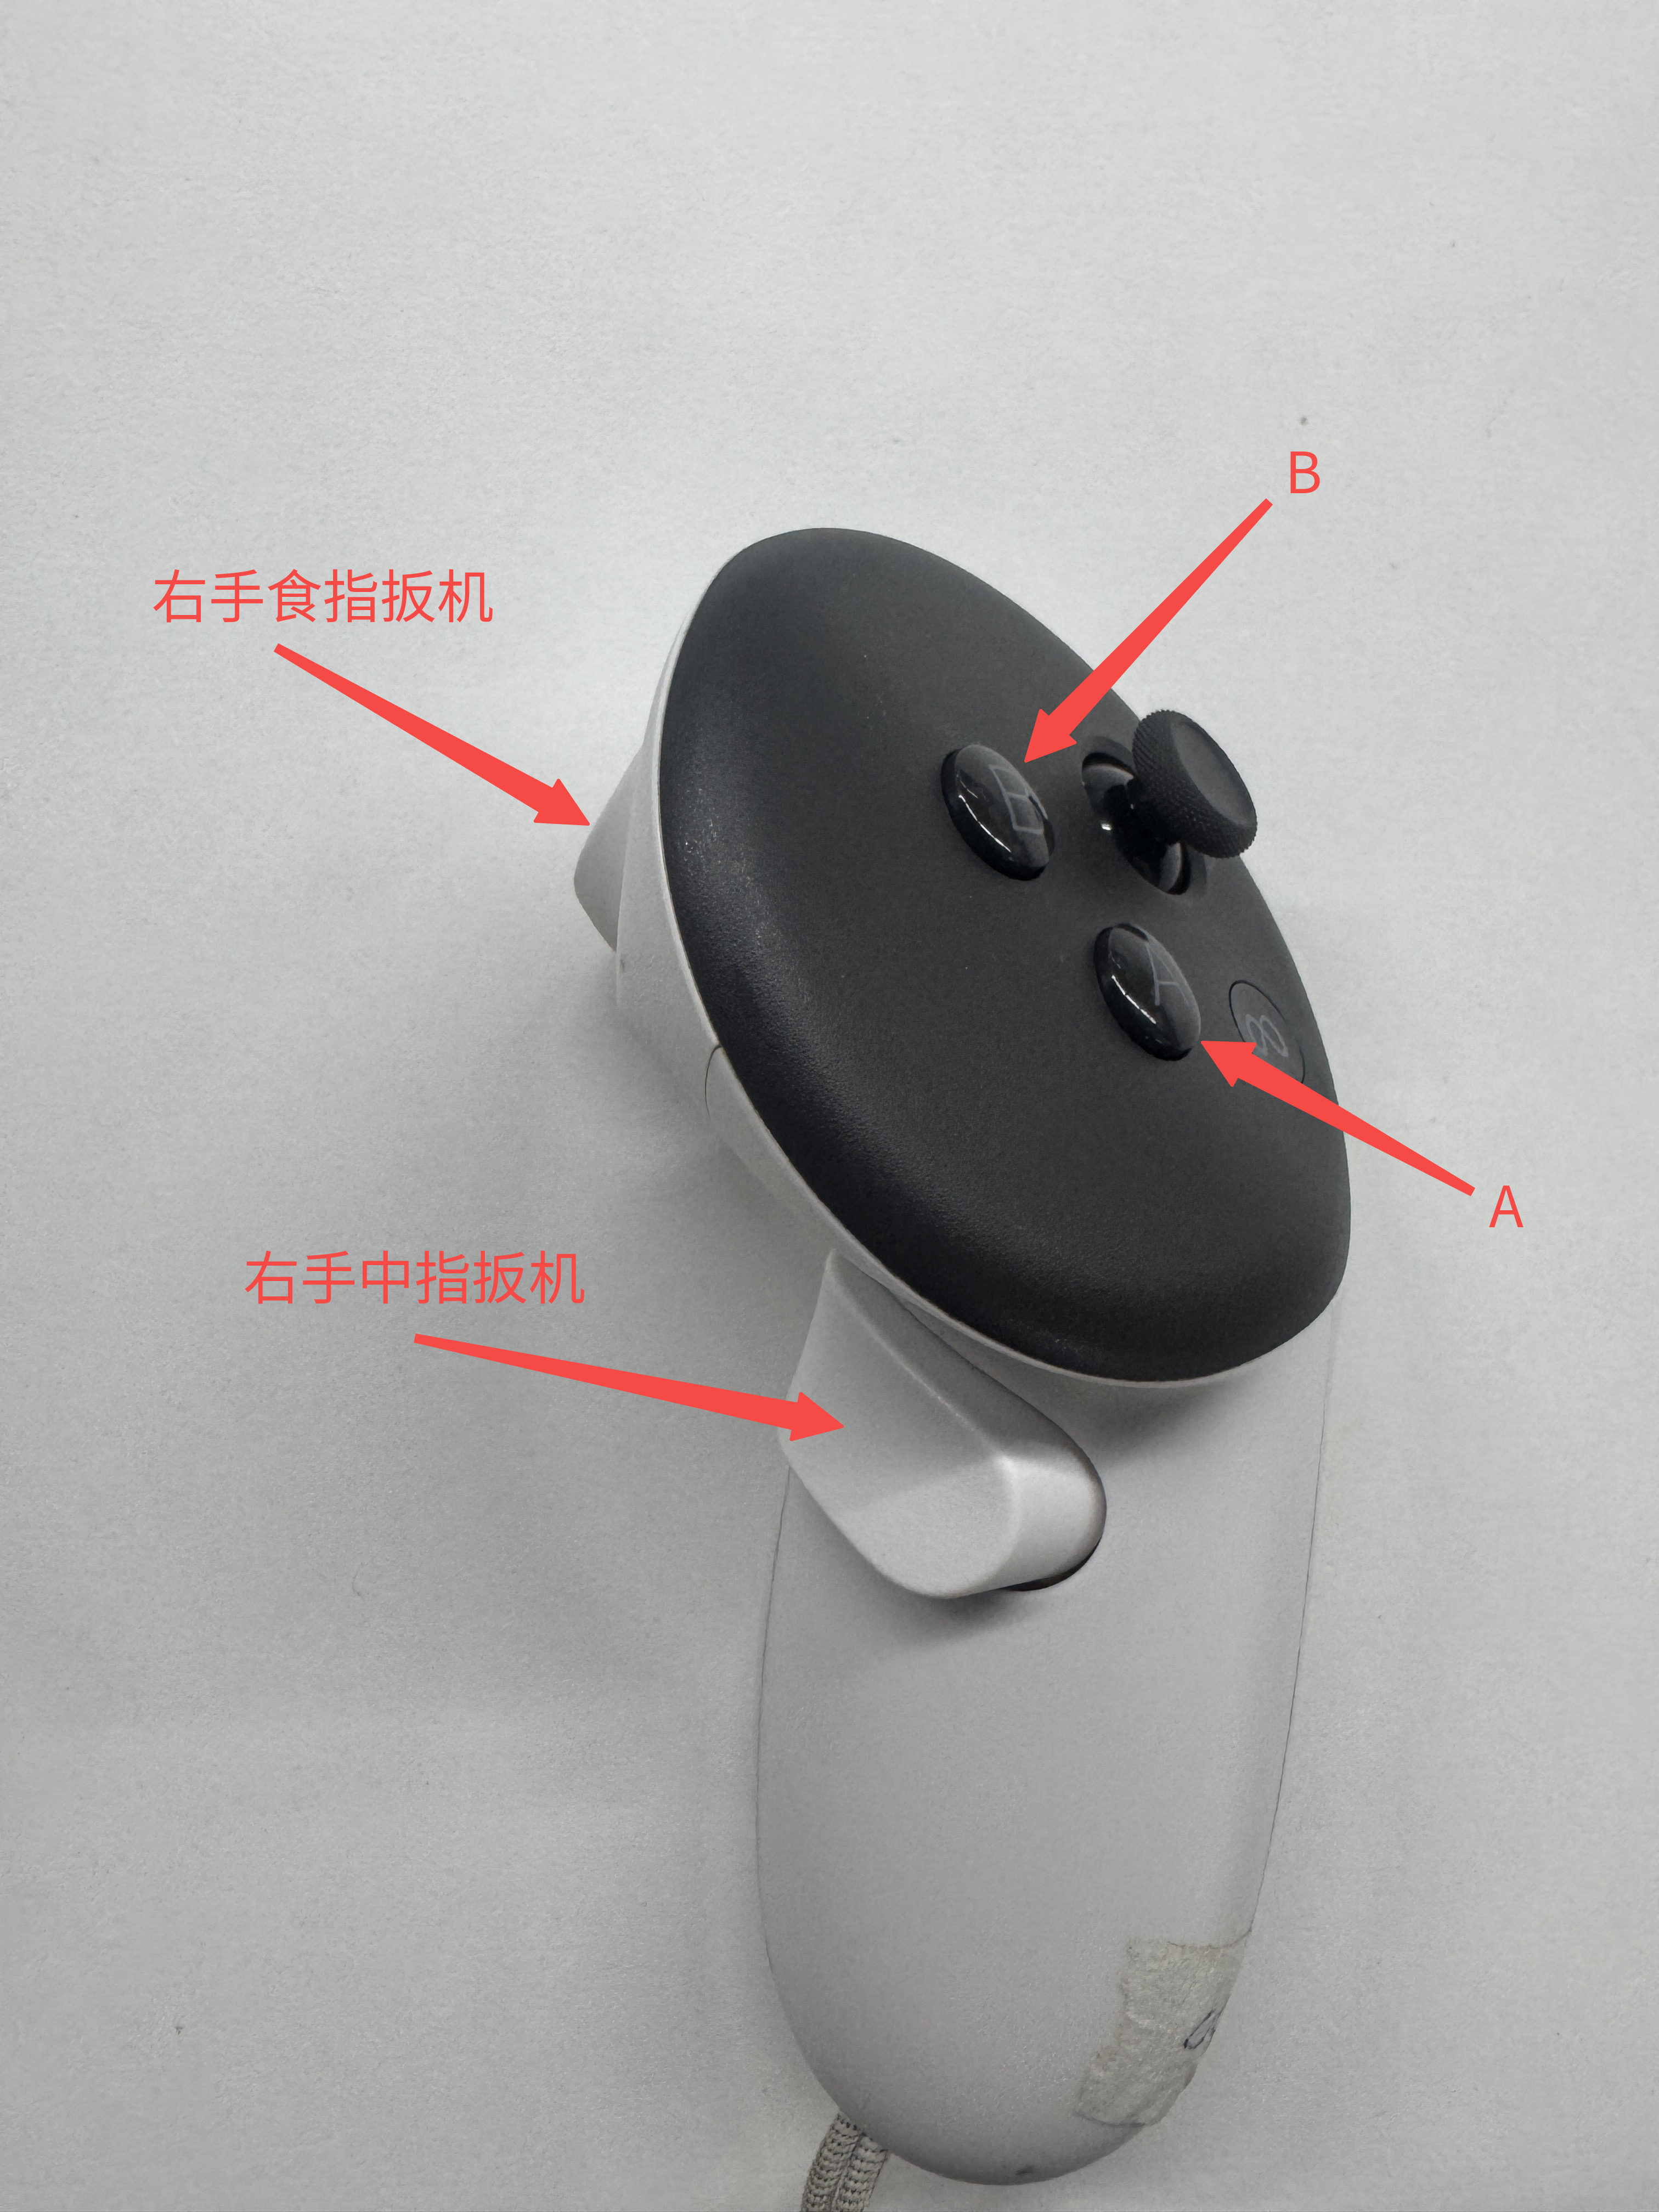
Figure 2: Right controller button layout
| Button | Function |
|---|---|
| A button (press once) | Start collecting data for the current episode |
| X button (press once) | End the current episode and proceed to the next one |
| Y button (press once) | Discard the current episode's data |
| B button (press once) | End collection and exit |
| Index-finger trigger (press and hold independently on either side) | Enable control of the robotic arm on the corresponding side |
| Middle-finger trigger (independent on either side) | Press: close the gripper Release: open the gripper |
Caution
Robotic arm control state: During data acquisition, keep the index-finger trigger on the corresponding side pressed to ensure that the follower arm on that side responds to VR control normally.
State retention: If you release the index-finger trigger during operation, the robotic arm stops responding. When you press it again, the robotic arm remains in the position where it was when the trigger was released.
Information
If you encounter the error error while attempting to bind on address('0.0.0.0',8080):address already in use:
Data Storage Location#
Here,<repo_id> is determined by the dataset.repo_id field in the configuration file.
⚠️ Important: You must change
dataset.repo_idfor every new collection run. Otherwise, a dataset with the same name will be overwritten and historical data will be lost.
Dataset Post-Processing#
After collection is complete, use LeRobot tools to modify and process the dataset.
Supported Operations#
- Delete specified episodes: Remove low-quality demonstration data
- Split a dataset: Divide training, validation, and test sets by proportion
- Merge datasets: Combine multiple related datasets
- Manage features: Add or delete data fields
Usage#
For specific procedures and API documentation, see the official LeRobot documentation.
Tip: Back up the original dataset before modifying it.
Data Visualization#
After data acquisition is complete, use the rerun tool to visualize and validate the dataset, checking collection quality, task execution, and data integrity.
Visualization Command Example#
python3 -m lerobot_play.utils.rerun_vis \
    --repo-id test_playe2 \
    --root ~/.cache/huggingface/lerobot/test_playe2 \
    --robot-type airbot_play_follower \
    --episode-index 0 \
    --max-episodes 1 \
    --batch-size 32 \
    --num-workers 0
Parameter Descriptions#
| Parameter | Description | Default |
|---|---|---|
--repo-id |
Dataset name (the same as repo_id in the collection configuration) |
- |
--root |
Dataset storage path | ~/.cache/huggingface/lerobot/` |
--robot-type |
Follower-arm type (must match robot.type used during collection) |
- |
--episode-index |
Index of the episode to visualize (starting from 0) | 0 |
--max-episodes |
Maximum number of episodes to load | 1 |
--batch-size |
Data-loading batch size | 32 |
--num-workers |
Number of data-loading subprocesses | 0 |
💡 Usage Tips
The dataset may briefly pause when loaded for the first time. This is normal because video must be decoded or HDF5 files read.
After loading is complete, you can play it smoothly, drag the timeline, and inspect multiple camera views and joint trajectories.
Data Replay#
After data acquisition, replay the motion from a selected episode on the physical robot to validate data quality or demonstrate the task.
Replay Command for a Single-Arm Play Device#
python3 -m lerobot_play.replay \
    --dataset.repo_id test_playe2 \
    --dataset.root ~/.cache/huggingface/lerobot/test_playe2 \
    --robot.type=airbot_play_follower \
    --robot.port=can0 \
    --robot.id=airbot_play \
    --episode_index=0 \
    --fps=30
Replay Command for a Dual-Arm Device (Such as PTK)#
python -m lerobot_play.replay \
    --dataset.repo_id test_03 \
    --dataset.root /home/air/.cache/huggingface/lerobot/test_03 \
    --robot.type=airbot_PTK_follower \
    --robot.left_arm_port=can0 \
    --robot.right_arm_port=can1 \
    --robot.id=PTK_follower \
    --episode_index=0 \
    --fps=30
Caution
Single-arm devices use --robot.port.
Dual-arm devices such as PTK require --robot.left_arm_port and --robot.right_arm_port to be specified separately.
All robot-related parameters (type, id, and port) must exactly match the configuration used during collection. Otherwise, data parsing may fail or control may be abnormal.
| Parameter | Description |
|---|---|
--dataset.repo_id |
Dataset name; must match dataset.repo_id in the collection configuration |
--dataset.root |
Full dataset path (normally ~/.cache/huggingface/lerobot/<repo_id>) |
--robot.type |
Follower-arm type, such as airbot_play_follower or airbot_PTK_follower |
--robot.port |
CAN interface name for a single arm, such as can0 |
--robot.left_arm_port / --robot.right_arm_port |
CAN interfaces corresponding to the left and right arms of a dual-arm device |
--robot.id |
Robot identification ID; using the same value as during collection is recommended |
--episode_index |
Index of the episode to replay (starting from 0) |
--fps |
Replay frame rate (Hz); using the same value as run.fps during collection is recommended to ensure accurate motion timing |
Performance Tests#
The following performance-test data comes from benchmark tests of the official LeRobot data acquisition kit on different hardware platforms. The results reflect the performance characteristics of the LeRobot kit itself; this adaptation did not modify its underlying collection logic or performance.
| Platform | Combination | Mean CPU Load (Load Average) | Save Time (30s Collection) /s | Actual Frame Rate (FPS) |
|---|---|---|---|---|
| Legion Y7000 | replay+play+1usb |
1.47 | 2 | 30 |
play+play+1realsense |
1.47 | 2 | 30 | |
2*replay+2*play+3usb |
5.84 | 14 | 25 | |
2*play+2*play+3realsense |
7.73 | 15 17 (depth) |
30 | |
| AGX | replay+play+1usb |
2.92 | 13 | 30 |
play+play+1realsense |
4.66 | 14 18 (depth) |
30 | |
2*replay+2*play+2realsense+1usb |
7.01 | 23.1 24 (depth) |
29.8 | |
2*play+2*play+3realsense |
9.99 | 25 26 (depth) |
24.4 23.13 (depth) |
|
| NX | replay+play+1usb |
3.09 | 24 | 29.6 |
play+play+1realsense |
6.52 | 33.44 36.1 (depth) |
29.6 | |
play+play+1realsense+1usb |
8.21 | 49 | 25 |