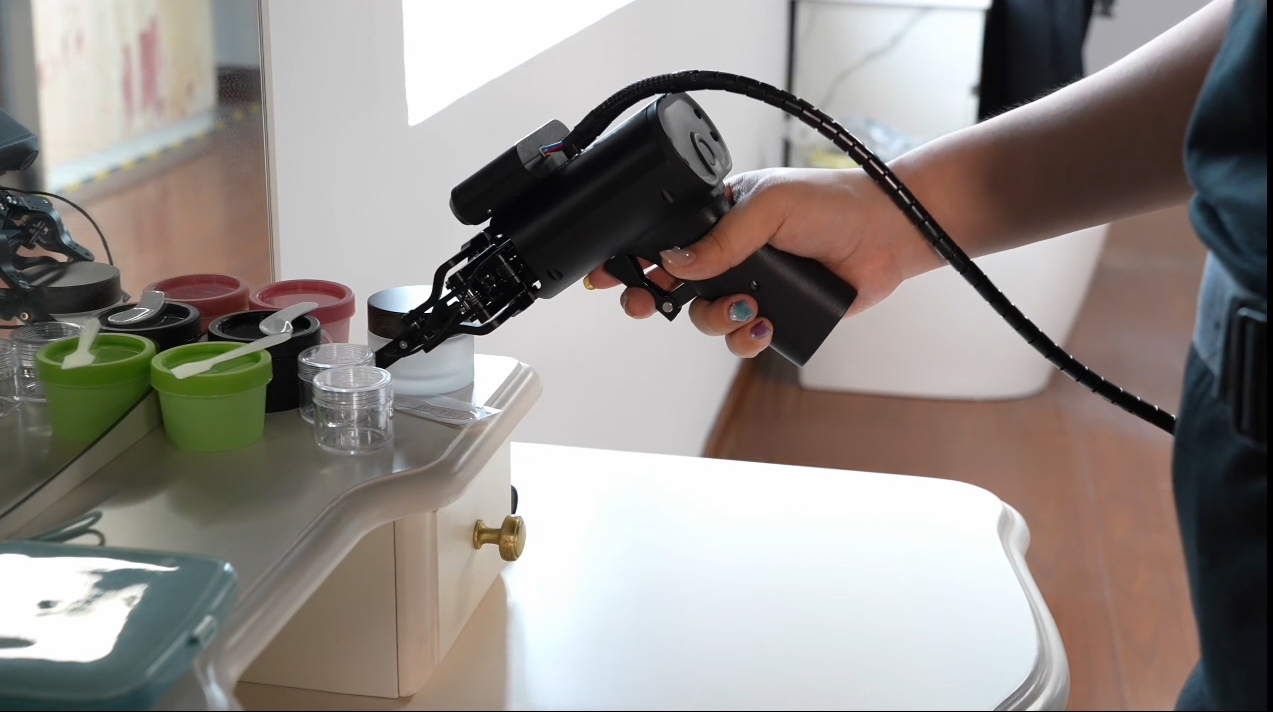
Data Acquisition Solution#
This page covers the AIRBOT MCAP data acquisition solution (airdc), including the v5.1.6.11 release notes, environment setup, camera configuration, teleoperation, collection workflow, and data visualization. Collected data is saved in .mcap format.
For LeRobot Play, see the LeRobot Play Data Acquisition Solution. For model training and deployment, see PI0.5 Model Reproduction. Follow the environment requirements and instructions for your chosen solution.
Version: v5.1.6.11#
Changelog#
- Improved post-processing (
post_capture):- Added pose transformations to correct pose differences between the leader and follower arms.
- Enabled automatic configuration by default, without additional setup.
- Added data acquisition for SLAMTEC mobile bases (pose, velocity, and info).
- Added support for concurrent camera capture and optimized the invocation logic to avoid potential performance issues.
- Stopped recording joint data whose values are all
None, such as Replay joint velocities and forces. Relevant warnings appear in the terminal at startup. - Improved the shutdown mechanism for V4L2 cameras.
- Fixed incorrect display of the save progress bar.
- Fixed unresponsive windows:
prepare_cv2is disabled by default, and troubleshooting instructions now cover application freezes. - Improved automatic configuration:
- Added support for specifying the directory and filename of the robot-arm reference configuration. Fixed missing joint-name fields in automatically generated ROS-format configurations.
- Added options to enable depth capture and asynchronous camera calls (
--depth,--cc). - Added automatic configuration for single- and dual-arm drag teaching (
--drag), with manual adjustments available for setups without grippers.
- Added instructions for resource-usage monitoring tools in the resource-usage section of
airdc/docs/troubleshooting/faq.md. - Expanded camera troubleshooting documentation.
- Added PlotJuggler visualization documentation.
- Renamed pose topics from
armtoeef. - Shortened the project and package name to
airdc.
System Environment Setup#
Requirements#
Make sure your system meets the following requirements:
- Python:
>= 3.9. Python 3.10 is recommended; other versions have not been fully tested. - Operating system:
- Supported: Linux, including Docker containers. Ubuntu is recommended; other distributions have not been tested.
- Unsupported: Windows and macOS.
- Untested: Windows Subsystem for Linux (WSL).
- Architecture:
- x86_64 (64-bit Intel/AMD).
- ARM64, such as NVIDIA Jetson.
- Tools:
- A POSIX shell, such as
sh, to run installation scripts. - Optional: a virtual environment manager, such as
condaorvenv.
- A POSIX shell, such as
- Resources:
- At least 2 GB of available memory.
- Disk space appropriate for the amount of data you intend to collect.
The robot SDK and camera drivers may impose additional requirements. Check the requirements of the backends you use.
Virtual Environment#
Create a separate Python environment to meet the Python version requirements and avoid dependency conflicts with other projects. For example, with conda:
Robot Setup#
Environment Requirements
If you created a Python virtual environment above, use it for the following dependency installation steps.
The collection application depends on the robot's software environment. Install and configure the drivers and Python SDK for your robot first.
Data Acquisition Software#
Environment Requirements
- Install the following dependencies in the Python environment containing your robot software.
- The installation script uses
aptfor system dependencies andpipfor Python dependencies by default. If you use different package managers, install the dependencies manually or adjust the script. You can also pass a system installation command to the script, for example:$SHELL ./install.sh sudo yum install -y. - Specify a branch or tag when cloning to keep versions consistent. The repository defaults to
main, the latest stable branch;developcontains development changes and may be unstable. Use a specific tag when a fixed version is required.
git clone https://github.com/DISCOVER-Robotics/AIRBOT-Data-Collection.git --depth 1 -b <tag/branch> data-collection
cd data-collection
conda activate airbot_data
$SHELL install/install.sh
You can generally replace $SHELL with bash in these commands. Dependency warnings may appear in red after installation; these generally do not prevent proceeding with the following steps.
Camera Information#
List the connected cameras:
The output includes each camera's name, device path and ID, USB port or bus, supported image formats, resolutions and frame rates, and the total number of devices.
Camera Check#
Connect all required cameras. For USB cameras, run:
Here, 2 4 6 are camera IDs. Check them with ls /dev/video* and adjust the command for your devices. Even-numbered IDs are generally used; odd-numbered IDs are generally unavailable for capture. The values after -ff specify each camera's video-stream format, usually MJPEG. See Camera FAQ (Chinese) for troubleshooting.
RealSense Cameras#
For Intel RealSense cameras, install the dependencies with $SHELL install/install_realsense.sh, then list connected camera serial numbers:
Data Acquisition Configuration#
The application uses Hydra for configuration. Default parameters are defined in YAML files and can be overridden on the command line.
Configuration covers the demonstrator or teleoperation system, sampler, manager, visualizer, finite-state machine (FSM), and general settings such as logging and data storage paths.
Start from the supplied airbot_ie configuration directory and adjust it for your setup. Its main components are:
- Demonstrator:
grouped demonstratorcombines devices in leader, follower, and observer roles for teleoperation and collection. - Sampler:
mcap samplersaves episode data as.mcapfiles using FlatBuffers schemas. - Manager:
keyboard managerworks withself managerto control the collection workflow from the keyboard. - Visualizer:
OpenCV visualizerdisplays and monitors data in real time.
See Common Configuration Adjustments (Chinese) for configuration details.
Starting Teleoperation#
Follow the instructions for your robot setup:
Data Acquisition Workflow#
Running the Application#
After completing setup, run the following command from the data-collection directory:
This uses the default configuration. To select a configuration file or override parameters:
--path selects the configuration file; the path shown is the default. dataset.directory=example saves data in the example folder under data. See Command-Line Overrides (Chinese) for more details.
The application prints keyboard controls at startup. Scroll up in the terminal to view them, or press i to print them again.
Collection Recommendations#
Demonstrations
- Keep movements smooth and natural, avoiding abrupt acceleration, pauses, and shaking.
- Vary the collected trajectories, while avoiding excessive differences between demonstrations.
- Make gripper opening and closing distinct so that leader and follower encoders report clear open and closed states.
- Leave a short pause between actions.
- Account for possible model prediction errors when handling objects. Avoid demonstrations that only grasp an object's edge.
Cameras
- Capture clear, focused images without freezing, blur, or dropped frames.
- Keep the manipulated object in view throughout the task. For larger objects, such as cups, a few partially visible frames may be acceptable.
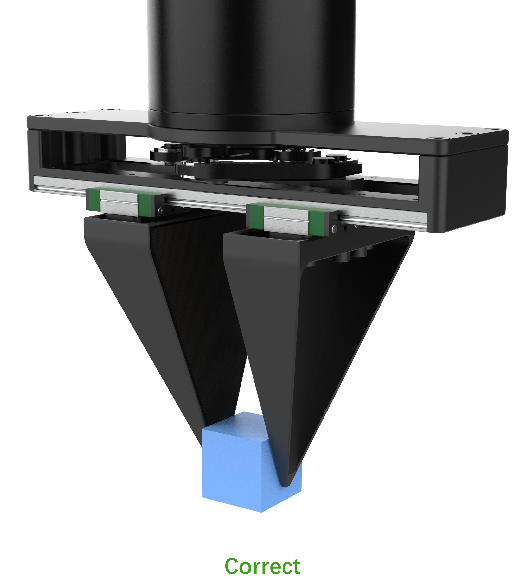
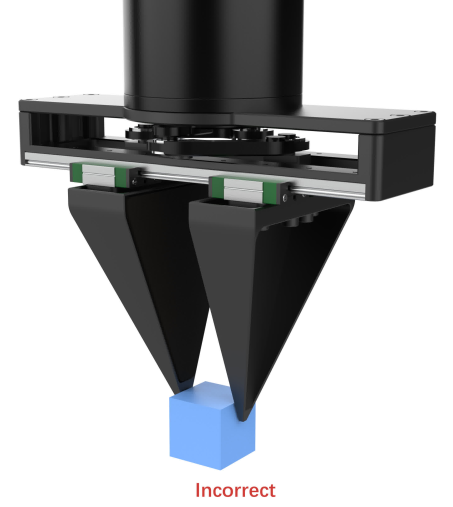
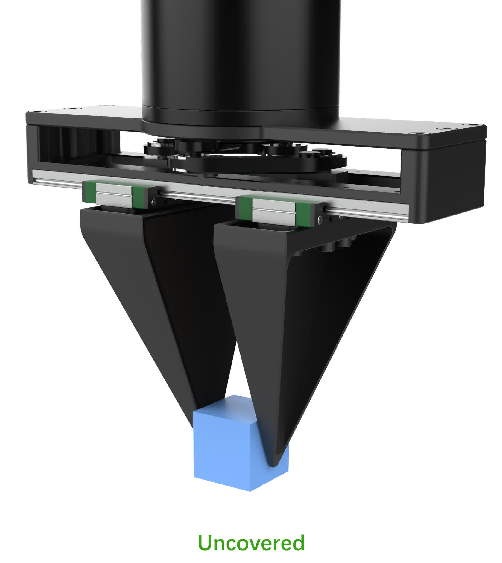
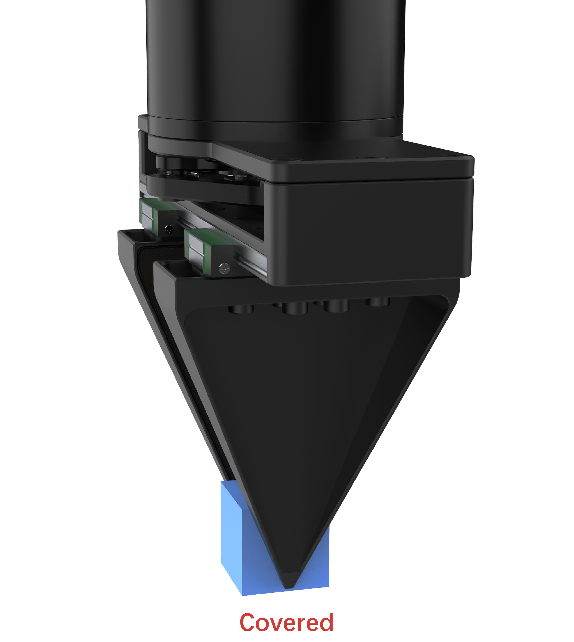
- Position environment cameras to avoid the gripper obscuring small objects, as illustrated below.
- Arm-mounted cameras should show the object and the gripper's opening and closing movements.
- Keep the leader arm out of environment-camera images, since it is absent during inference. The follower arm need not be visible at the start, but its interaction with the object must be visible during manipulation.
- Allow for changes in object placement when framing the scene. Keep the object visible and place its initial position near the center of the camera view where possible.
Collection Controls#
- Press Space to start recording.
- After completing the task, press
sto save. Wait for saving to finish, then press Space to start the next recording. - If a recording does not meet the collection requirements, press
qto discard it, then press Space to start again. - To remove an invalid recording that has already been saved, press
r, then press Space to start a new recording. - Press Esc to exit after collecting all required data.
Data Visualization#
Choose a visualization tool appropriate for the saved data format. The following guides are currently available in Chinese:
Performance Testing#
See Performance Testing (Chinese).
Frequently Asked Questions#
See the FAQ (Chinese).